
Home Improvement
Maintaining Compliance and Safety in Commercial Kitchens

One of the most fire-prone places in any industry is a professional kitchen, where you have to deal with high temperatures, open flames, and flammable oils commercial kitchens. The installation of sophisticated restaurant fire safety systems is essential for any establishment because a small grease flare-up can quickly turn into a structural disaster.
These systems are made to find unusual heat patterns and automatically use wet chemicals to put out fires before they can spread to the building’s ventilation hoods or infrastructure. These safety networks lower the risk to staff by adding automatic shut-offs for gas and electricity. This keeps the kitchen a safe, controlled place to work even when it’s busy.
To keep this equipment ready, you need to stick to strict inspection schedules and have professional oversight. In order to ensure that every portable unit is pressurized and works in an emergency, regular fire extinguisher testing is a crucial component of this maintenance. In the kitchen, having the right kind of fire extinguisher, like a Class K unit for grease fires, is only half the battle. Those units need to be tested for water pressure and checked inside on a regular basis to make sure they will work as expected. If you don’t do these regular checks, you could put your business at risk and have a lot of legal and insurance problems if something happens.
Important Parts of Kitchen Safety
A complete safety plan includes many layers of protection that work together to stop, find, and put out heat-related incidents.
Automated Suppression: Wet chemical systems are built right into the exhaust hoods. When a fusible link melts because of very high heat commercial kitchens, the system releases a special foam that reacts with fats and oils to make a “soap” layer that doesn’t burn. This is called saponification.
These are connected to the system that puts out fires. When the fire alarm goes off, the gas supply to the burners is cut off right away to stop the main fuel source.
Manual Pull Stations: Automation is important, but staff must be able to manually trigger the suppression system if they see a fire starting before the sensors do.
Knowing what maintenance needs to be done
Because of the grease, steam, and heat in a kitchen, safety equipment can wear out faster than in other places. Once a month, you should do a visual check to make sure the units are in the right place and the gauges are showing the right pressure. Every year, a more thorough maintenance service is needed to check the mechanical parts and the extinguishing agent itself.
Also, depending on the model, hydrostatic testing is required every five to twelve years to make sure the cylinder is strong enough to handle pressure without breaking.
Training and How People React
The people who use the most advanced technology can only do so much with it. Training employees is an important part of any safety plan. Every worker should know where the nearest exit is, how to use the manual pull station, and how to use portable equipment safely. Regular drills help make sure that when things get tough commercial kitchens, the response is calm and thought out instead of panicked.
Owners can keep their people and their investment safe by using the latest technology, keeping things in good shape, and hiring well-trained staff. It’s not just about passing an inspection to make sure all systems are up to code commercial kitchens. It’s also about creating a culture of safety that keeps the focus on food where it belongs.
Home Improvement
The Hidden Work Behind Great Glass: A Practical Guide to Sourcing, Specs, and Site Success

If you’ve ever stood on a jobsite staring at a stack of glass panels and thought, “This either goes smoothly… or it becomes a nightmare,” you already know the truth: glass is unforgiving. A small error in size, edge finishing, tempering, or packaging can turn a clean installation into delays, re-orders, and awkward conversations with clients.
That’s why choosing the right glass sheet manufacturer isn’t just a purchasing decision—it’s a project strategy. The manufacturer you choose can impact everything that happens later: installation speed, waste, safety outcomes, the final look, and even the client’s confidence in your work.
This follow-up article takes a different angle from the first one. Instead of focusing mainly on glass types, it focuses on the real-world sourcing process: how to write specs that prevent mistakes, how to coordinate glass with hardware and site conditions, and how to evaluate a supplier based on what actually matters in the field.
Why glass sourcing is different from sourcing other materials
With many construction materials, you can “adjust on site.” If a board is slightly off, you cut it. If a tile pattern needs correction, you shift it. With glass, there is no friendly adjustment. Once the glass is fabricated—especially if it’s tempered—changes are difficult, expensive, or impossible.
Glass projects fail for predictable reasons:
- A dimension is off by a few millimeters and panels don’t fit channels.
- Holes are drilled slightly wrong and hardware alignment becomes impossible.
- Edge chips happen during transport and cracks appear later.
- Tempered panels arrive with distortion or roller wave that looks cheap under lighting.
- Installation crews lose time trying to “make it work,” and the schedule slips.
A good sourcing process reduces these risks before the first sheet is produced.
Start with the application, not the glass
One mistake buyers make is choosing “a glass type” too early—clear, tinted, frosted—without thinking about the environment. A better approach is to start with the situation, then let the glass selection follow.
Ask these questions first:
- Is this glass in a high-contact area? (doors, partitions, railings)
- Is it overhead? (canopies, skylights)
- Is it exterior-facing? (facade, storefront, balcony)
- Does it need privacy? (bathrooms, offices, meeting rooms)
- Will it be exposed edge glass? (furniture tops, shelves, frameless systems)
- Does it need energy performance? (hot climate, AC spaces)
When those answers are clear, you can specify glass type and processing more confidently—and you can judge whether a supplier actually understands your requirements.
The spec sheet that prevents 80% of costly problems
If you want fewer mistakes, your spec sheet needs to be “installation-ready,” not just a rough idea. Below are the details that separate professional sourcing from guesswork.
1) Exact dimensions and measurement method
For glass, “approximate” doesn’t exist. Provide final sizes and state how they were measured. If a panel sits in channels, your dimension must account for channel depth and clearance.
Tip: Always confirm whether dimensions are “tight size” or include allowances for gaskets, setting blocks, and movement.
2) Thickness and tolerance
Thickness isn’t just about strength; it affects hardware compatibility. Certain clamps and U-channels are built for specific thickness ranges. Ask the manufacturer what tolerance they follow and ensure it matches your system.
3) Edge finishing (this is where quality shows)
Edge work is one of the most visible quality signals. Decide what you need:
- Seamed edge: basic safety edge, minimal refinement
- Ground edge: smoother and more consistent
- Polished edge: clean, premium finish for exposed edges
If the edge will be visible to customers, polished edges often make the project look more expensive and professionally built.
4) Corner style
Sharp corners create stress points and are easier to chip. Rounded corners or radiused corners reduce risk and look cleaner in many interior installs.
5) Holes, cutouts, and notches
This is where small errors cause big chaos. Provide:
- Hole diameter
- Hole center position from edges
- Notch dimensions
- Internal corner radius requirements
- Whether holes need beveling
And confirm if the glass will be tempered—because tempered glass can’t be drilled after processing.
6) Surface and visual expectations
If the project is a high-end office, hotel, or retail space, appearance matters. You should state expectations around:
- Scratch-free surface
- Minimal distortion
- Clean, consistent tint (if tinted)
- Uniform frosting (if frosted)
This isn’t being “picky.” It’s being realistic about what your client will notice.
Coordination with hardware: the step people skip
If you want glass to install smoothly, coordinate glass specs with hardware specs early.
Here are common coordination points:
- Clamp thickness compatibility: clamps often support a limited thickness range.
- Hinge hole patterns: hinge models have specific hole spacing and size requirements.
- Channel and gasket systems: channel interior width + gasket thickness determines glass fit.
- Handle and lock cutouts: correct hole positions matter for alignment and comfort.
A strong supplier doesn’t just accept your specs—they’ll ask the right questions to ensure your specs match the hardware system.
Quality is not a claim; it’s a process
Many suppliers describe themselves as “high quality.” The difference is whether quality shows up in repeatable results.
A reliable manufacturer typically has clear answers on:
- How they reduce edge chips during processing
- How they inspect surface defects before packing
- How they control thickness and cutting consistency
- How they handle custom drilling without stress cracks
- How they package to prevent rubbing and breakage in transit
This is why site professionals value consistency over promises. You don’t want one perfect batch and one problematic batch. You want the same quality every time.
Packaging and delivery: where many projects lose money
A lot of glass damage happens after production, during movement and transport.
Look for these packaging signals:
- Proper separators between sheets
- Edge protectors
- Stable crating or A-frame packing
- Strapping that prevents shifting
- Labeling for orientation and handling
Even the best glass can arrive ruined if it’s packed carelessly. A good supplier treats packaging like part of manufacturing—not an afterthought.
The “trial order” approach for smarter buyers
If you’re placing a large order or working with a new supplier, consider a structured trial approach:
- Start with a small batch of the most complex items (cutouts, drilling, exposed edges).
- Check the glass under real lighting (especially for interior offices and retail).
- Test hardware compatibility before committing to full quantity.
- Confirm packaging quality and transport damage risk.
- Scale only after validation.
This method reduces the risk of being stuck with an entire batch that doesn’t meet expectations.
What experienced buyers ask a manufacturer before ordering
Here are practical questions that quickly reveal how professional the supplier is:
- What tolerance do you follow for thickness and cutting?
- What edge finishing options do you provide, and what is best for exposed edges?
- How do you handle drilling and notches to reduce cracking risk?
- Can you support custom sizes consistently across batches?
- What packaging method do you use to reduce scratches and edge chips?
- What’s your usual lead time for repeat orders?
- Do you inspect glass before shipment, and what defects do you filter out?
The goal is not to interrogate a supplier—it’s to confirm they operate like a professional production partner.
Why sourcing from a specialized manufacturer improves branding and trust
When projects go smoothly, clients assume you’re organized and skilled. When glass arrives wrong or installs poorly, clients blame the contractor—even if the issue started at the supplier level.
Partnering with a specialist reduces these risks:
- Better accuracy and fewer fitment surprises
- Cleaner finishing that looks premium
- More dependable supply planning
- Better support for custom requirements
- Reduced waste and re-order frequency
Midway through supplier evaluation, many teams realize that working with an experienced glass sheet manufacturer can actually reduce total project cost—not because the glass is the cheapest, but because it protects labor time, prevents delays, and reduces material waste.
Real-world use cases where manufacturer consistency matters most
1) Frameless partitions and office glass
These projects expose edges and reflections. Even slight distortion looks obvious, and edge quality becomes part of the interior design.
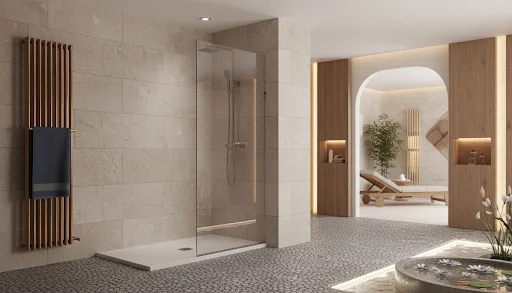
2) Shower enclosures
Hardware alignment is critical. Hole placement, edge finishing, and tempering consistency directly affect performance and safety.
3) Railings and balustrades
Safety requirements are high. Thickness, processing, and edge finishing all matter—not just “strong glass.”
4) Storefronts and facade elements
Large panels are harder to handle. Packaging quality and consistency are major factors, especially if you’re managing schedules tightly.
5) Decorative interior glass
Lighting makes flaws visible. Scratches, uneven frosting, or poor polishing will show immediately.
Common buyer mistakes and how to avoid them
Mistake 1: Only comparing price per sheet
Fix: Compare total installed cost, including labor risk, waste, lead time, and rework probability.
Mistake 2: Not documenting edge finish and corner style
Fix: Put it in writing. Make “polished” vs “ground” explicit.
Mistake 3: Assuming holes can be added later
Fix: If glass will be tempered, all drilling must be done before tempering.
Mistake 4: Ignoring packaging and transport risk
Fix: Ask how they pack and how they prevent rubbing and edge impact.
Mistake 5: Treating the supplier like a vendor, not a partner
Fix: Choose suppliers who communicate clearly and confirm specs instead of blindly accepting them.
Closing Note
If you want glass installations to feel smooth and professional, most of the work actually happens before installation begins—during specification, coordination, and supplier selection. The right manufacturing partner helps you avoid costly mistakes, reduces material waste, and ensures that every panel arrives ready for clean and confident installation.
Companies that prioritize consistent production standards, accurate processing, and reliable delivery create long-term value for contractors and project managers. Businesses like mannleecw.com focus on delivering precision-manufactured glass solutions that support both structural performance and visual excellence across a wide range of construction and fabrication needs.
When you treat glass sourcing as a structured process instead of just a purchase decision, your timelines improve, your results look sharper, and your clients notice the difference.
The term fix shower glass encompasses a range of maintenance, repair, and restoration tasks that address common issues such as scratches, water spots, soap scum buildup, and structural problems with the enclosure hardware. While catastrophic breakage of tempered shower glass requires professional replacement, most common issues can be successfully resolved through proper techniques and specialized products, significantly extending the life and clarity of the enclosure.
This extensive, informative article breaks down the most frequent problems encountered with fix shower glass—from minor cosmetic damage to structural hardware instability—providing detailed, step-by-step methods for maintenance, restoration, and repair to restore your shower to its original pristine condition.
Problem 1: Hard Water Stains and Soap Scum (Restoration)
The most common issue affecting shower glass is the tenacious buildup of mineral deposits (limescale) and soap scum, which severely diminish clarity and aesthetic appeal.
Identifying the Buildup
- Limescale: Appears as hazy, white, or chalky spots, often feeling rough to the touch. This is caused by calcium and magnesium left behind after water evaporates.
- Soap Scum: A dull, sticky film caused by the reaction of soap with the minerals in hard water.
Restoration Method (Non-Abrasive)
- Preparation: Always clean the glass first to remove loose soap scum using a microfiber cloth and dish soap.
- Acidic Treatment: Hard water stains require an acidic agent to dissolve the mineral bonds.
- White Vinegar: Mix equal parts white vinegar and distilled water in a spray bottle. Spray generously onto the glass and let it sit for 15 to 30 minutes.
- Citric Acid/Specialized Cleaner: For very heavy buildup, use a commercial descaler specifically designed for glass, or a paste made from baking soda and vinegar.
- Scrubbing: Use a non-abrasive nylon scrubber or the soft side of a sponge. Never use steel wool or harsh scouring pads, which will scratch the tempered glass surface.
- Rinsing: Rinse thoroughly with warm water and immediately squeegee the glass dry to prevent new spots from forming.
Problem 2: Scratches and Etching (Repair and Prevention)
Scratches and deep etching (permanent pitting caused by long-term mineral damage) are the most difficult to fix shower glass. While deep scratches cannot be removed, shallow ones can often be polished out.
Repairing Minor Scratches
- Cleaning: The area must be perfectly clean and dry to accurately assess the scratch.
- Polishing Compound: Use a specialized cerium oxide polishing compound, which is the standard industry material for buffing out fine glass scratches.
- Application: Apply the compound with a damp felt wheel or pad attached to a low-speed rotary drill or buffing tool. Work in small, controlled circular motions, keeping the surface slightly wet.
- Caution: This process removes microscopic layers of glass and must be done carefully to avoid creating lens effects or further distortion. Deep scratches cannot be safely removed.
Preventing Future Etching
- Hydrophobic Coatings: If the glass is not factory-coated, apply a professional glass sealant or hydrophobic coating (like Rain-X for glass) every few months. This creates a non-porous barrier that repels water and prevents mineral adhesion.
- Daily Squeegee: Consistent use of a squeegee immediately after showering is the single best preventative measure.
Problem 3: Loose or Corroded Hardware (Structural Fix)
Over time, the hinges, clamps, and seals supporting the shower glass can become loose, corroded, or dysfunctional, leading to poor door alignment and water leaks.
Fixing Alignment and Sagging Doors
- Tighten Hinges: If a shower glass door is sagging, the hinges usually need adjustment. Use a screwdriver (often hexagonal or Allen keys) to gently tighten the hinge screws holding the glass to the frame/wall.
- Gasket Replacement: If the door is scraping or misaligned, the nylon or plastic gaskets (washers) inside the hinge may be worn. Replacing these gaskets can often resolve minor sagging and restore proper alignment without major disassembly.
- Check Wall Anchors: For extreme sagging, the mounting screws or wall anchors holding the hinge to the wall may be loose. This requires a professional to safely remove the door and re-secure the anchors (sometimes using larger anchors or cement plugs).
Replacing Seals and Sweeps
- Worn Seals: The clear vinyl seals (gaskets) running along the door edges and the vinyl “sweep” (the fin along the bottom edge) are designed to contain water.
- Fix: When they yellow, crack, or fail, they must be replaced. Measure the thickness of the shower glass and purchase a new vinyl seal/sweep. These usually slide or clip onto the glass edge and are easily replaced by the homeowner.
Problem 4: Permanent Failure (When to Replace)
If shower glass is extensively pitted (etched) or has deep scratches across the main viewing area, restoration is usually impractical.
- Pitting: Severe chemical etching compromises clarity permanently.
- Breakage: If the tempered glass shatters, it must be carefully cleared and replaced. Never attempt to use or install non-tempered glass in a shower.
When replacement is necessary, measure the existing panel accurately and specify tempered glass with an easy-clean coating for maximum longevity and minimal maintenance.
Conclusion
The ability to fix shower glass largely depends on consistent care and the severity of the damage. By addressing hard water spots promptly with non-abrasive methods and ensuring all structural hardware remains secure, you guarantee that your shower enclosure remains clear, safe, and elegant for years to come.

The lighting industry has embraced designer collaborations, partnering established interior designers and architects with manufacturing expertise to create distinctive fixture collections. These partnerships yield products that combine creative vision with practical functionality, offering homeowners access to designer aesthetics at accessible price points.
How Designer Collaborations Work
Designer lighting collaborations typically follow established patterns:
Design Development: Designers create concepts reflecting their aesthetic vision and understanding of market needs. These initial ideas may be sketches, mood boards, or detailed specifications depending on the designer’s background and working style.
Technical Translation: Manufacturers’ engineering teams translate design concepts into producible products. This phase requires balancing creative intent with manufacturing realities, electrical requirements, and safety standards.
Prototype Refinement: Physical prototypes reveal how designs work in three dimensions. Designers evaluate proportions, light quality, and visual impact, requesting revisions until pieces match their vision.
Production Launch: Final designs enter production, typically manufactured in facilities with quality control systems ensuring consistency across units. Marketing efforts communicate the collection’s design story and intended applications.
Benefits of Designer Collections
Designer collaborations offer distinct advantages for consumers:
Professional Aesthetics: Designers bring trained eyes for proportion, material, and detail that create visually superior products. Their experience specifying fixtures for high-end projects informs designs that work beautifully in real interiors.
Curated Selection: Designer collections offer coordinated pieces sharing design DNA. This curation simplifies selecting multiple fixtures that work together harmoniously throughout homes.
Accessible Pricing: While commissioning custom fixtures from prominent designers requires significant budgets, manufactured collections make designer aesthetics available at standard retail price points.
Story and Meaning: Designer pieces carry narratives—inspiration sources, design intentions, maker stories—that generic fixtures lack. These narratives enhance ownership satisfaction and provide conversation starting points.
Notable Designer Lighting Collections
The Visual Comfort Studio collection exemplifies successful designer collaboration, featuring fixtures from celebrated designers whose work appears in prestigious publications and award-winning interiors. These collections translate high-design aesthetics into accessible products without sacrificing quality or visual impact.
Such collections demonstrate that exceptional design need not be exclusive. When talented designers partner with capable manufacturers, the resulting products bring sophisticated aesthetics to mainstream markets.
Selecting from Designer Collections
Maximize designer collection value through thoughtful selection:
Understand the Vision: Research designers’ broader work and stated intentions for collections. Understanding design philosophy helps select pieces that authentically represent designer aesthetics rather than incidental elements.
Consider Coherence: Designer collections typically share design language—proportions, materials, finishes—that creates harmony when multiple pieces appear together. Leverage this coherence when specifying fixtures for entire homes.
Evaluate Quality: Designer names don’t guarantee quality. Examine materials, construction, and specifications to ensure products justify their positioning. Reputable manufacturers maintain quality standards across designer and standard collections.
Think Long-Term: Well-designed pieces transcend trends, remaining relevant across changing fashions. Prioritize timeless designer work over trendy pieces that may quickly date.
Designer Collections vs. Custom Work
Understanding the spectrum from manufactured collections to custom commissions helps homeowners select appropriate options:
Manufactured Collections: Fixed designs produced in quantity. Offer excellent value, consistent quality, and immediate availability. Ideal for most residential applications where designer aesthetics matter but unlimited budgets don’t exist.
Modified Standard: Some manufacturers offer customization options—alternate finishes, modified dimensions, different lamp configurations—applied to standard designs. These options provide personalization within efficient manufacturing frameworks.
Full Custom: Designers and fabricators create one-of-a-kind fixtures to specific requirements. This approach suits truly unique situations where no manufactured option satisfies requirements, but involves significant cost and timeline implications.
Supporting Design Excellence
Purchasing designer lighting supports broader design culture:
Designer Recognition: Commercial success enables designers to continue creative work. Supporting designer products encourages continued innovation and risk-taking.
Manufacturing Investment: Successful designer collaborations justify manufacturer investments in design development. This investment cycle drives industry-wide quality improvement.
Cultural Value: Design excellence enriches daily life in ways difficult to quantify but easy to experience. Surrounding ourselves with thoughtful design elevates ordinary moments.
Integrating Designer Pieces
Successfully incorporating designer lighting requires attention to context:
Respect the Design: Avoid modifying designer pieces or placing them in contexts that contradict design intentions. Let pieces express their intended character.
Create Conversations: Designer fixtures often become room focal points. Position them where visibility showcases design while lighting performance serves practical needs.
Build Around Anchors: Select furniture, finishes, and accessories that support rather than compete with statement lighting. Strong designer pieces deserve supporting roles from surrounding elements.
Mix Thoughtfully: Combining multiple designer pieces works when collections share sensibilities or when deliberate contrast creates intentional creative tension. Avoid random mixing that dilutes coherence.
Designer lighting collaborations democratize excellent design, making thoughtful aesthetics accessible beyond exclusive circles. These partnerships serve everyone seeking beautiful, functional illumination.

Precision Application for High Volume Insulation Projects

Personal Style in the Modern Urban Wardrobe

Maintaining Compliance and Safety in Commercial Kitchens

How Affordable Explainer Videos USA Are Helping Brands Compete with 3D Animation Houston Studios

Why Professional Animal Control Makes All the Difference
-

 General6 months ago
Felixing: A Philosophy of Turning Simple Ideas into Wonders
-

 Health5 months ago
Lufanest: Effective Local Anesthesia with Fewer Risks
-

 General6 months ago
bardoek: The Artistic Heritage Inspiring Modern Creative Trends
-

 Entertainment4 months ago
هنتاوي.com: Your Gateway to Arabic Anime Content
-

 General5 months ago
Discover Anonib AZN: An Anonymous Asian Forum
-

 Fashion6 months ago
fashionisk .com – Your Ultimate Guide to Trendy, Smart Fashion
-

 Lifestyle6 months ago
Mariano Iduba: A Visionary Leader in Global Digital Growth
-

 Fashion6 months ago
Casîo: Explore Legacy, G-SHOCK Watches, Keyboards, and More