
Home Improvement
How does Wall Texture Influence Paint Adhesion and Finish Quality?
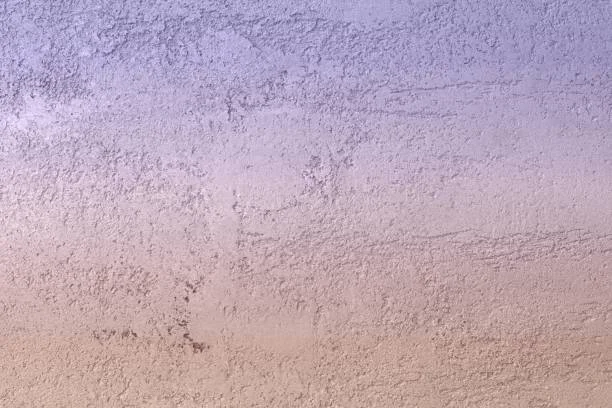
Wall texture has a direct effect on how paint bonds, spreads, dries, and finally appears under natural and artificial light. A smooth wall and a heavily textured wall may receive the same coating, yet the results can look completely different because the surface profile changes how the paint film settles. Texture affects more than appearance alone. It influences how much primer is needed paint adhesion, how evenly moisture leaves the coating, how well the finish resists wear, and whether flaws become more visible or less noticeable after the job is complete. That is why painters study the wall surface carefully before choosing materials and application methods. Paint performance begins with the character of the surface underneath it.
Texture And Coating Behavior
Roughness Changes How Paint Grips The Surface
Paint adhesion depends heavily on how well the coating anchors itself to the wall, and texture plays a major role in that adhesion. A lightly textured wall may provide enough surface variation to help primer and paint hold effectively. Still, a heavily uneven wall can create valleys, peaks, and porous areas that receive product at different rates. Some raised textures absorb coating faster, while tighter or previously painted high spots may resist it, creating an uneven bond across the same wall. This inconsistency can lead to thin coverage at upper points and excessive build-up in recessed areas paint adhesion, affecting both durability and appearance. Adhesion problems are more likely when the texture has dust trapped inside it, when older coatings are chalking, or when patch repairs create abrupt differences in porosity. A painter evaluating a surface for Richmond, VA Residential Painting Service work might notice that the texture itself is not the only issue, but how it combines with age, patching, and prior paint layers to influence how reliably the new coating will adhere.
Smoothness And Uniformity Affect Finish Appearance
Wall texture also shapes finish quality because the final look of painted walls depends on how evenly light moves across the surface. On a smooth wall, even minor application flaws, such as lap marks, roller lines, or patched areas, can become highly noticeable, especially with eggshell or semi-gloss finishes. On textured walls, those same flaws may be softened visually by the irregular surface, but other problems can instead appear. Heavy texture can create shadowing, inconsistent sheen, and uneven film thickness, making one section of the wall look darker or flatter than another. The more pronounced the texture, the more difficult it becomes to create a uniform visual result from every angle. Texture can also affect color perception because recessed areas catch light differently than raised sections. That means the same paint may appear richer or duller depending on the wall profile. Finish quality is not only about using the right color or product. It is also about understanding how the wall’s surface pattern will shape the way the completed paint job is seen throughout the room.
Porosity And Product Absorption Influence Coverage
Another reason wall texture matters is that different textures absorb primer and paint differently. Fresh drywall repairs, skim-coated sections, orange peel finishes, knockdown textures, and old plaster each absorb coatings differently depending on density and surface openness. A wall with mixed texture often creates mixed absorption, which can lead to flashing, uneven sheen, or visible transition lines after drying.
This is especially noticeable when repaired areas are sanded smoother than the surrounding wall or when old textured surfaces have worn down over time. Painters often rely on primer to reduce that imbalance, but primer alone may not solve everything if the texture variation is significant. The application method also matters, because rollers with the wrong nap may miss recesses or overload high spots. When product absorption changes from one part of the wall to another, finish consistency becomes harder to control. Coverage issues are therefore not always caused by poor paint quality or weak application. Many begin with a textured surface that pulls coating unevenly and dries at different rates across the wall.
Application Technique Must Match The Texture Profile
Texture influences not only what paint does after it is applied, but also how it must be applied in the first place. A very smooth wall may require careful rolling and backrolling to avoid visible marks, while a textured wall may need a thicker roller nap to push coating into recessed areas. Brushwork around corners, repairs, and trim lines also varies with surface profile. If the painter presses too lightly on textured walls, low areas may remain undercoated.
If too much pressure is applied, material can accumulate on the raised portions, creating a heavy appearance. Spray application may help in some situations, but even then, backrolling is often needed to work the paint into the texture and create a more secure bond. This becomes even more important when repainting walls that already have multiple coats, since each layer can slightly soften or fill the original texture pattern. Matching the application method to the surface helps control film build, reduce missed pockets, and improve overall finish quality. Texture requires adaptation, not a one-method approach carried from wall to wall.
Texture Decisions Shape Lasting Results
Wall texture has a lasting influence on paint adhesion and finish quality because it affects bonding, absorption, light reflection, and application technique simultaneously. A surface that looks simple at first glance may actually contain enough variation to change how the entire coating system performs. That is why painters pay close attention to texture before selecting primer, roller nap, sheen level, and preparation steps. Smooth walls reveal different flaws than rough ones, and heavily textured walls demand different methods than lightly textured surfaces. When texture is understood early, the paint job becomes more consistent, durable, and visually balanced. Good results do not come from color alone. They come from matching the coating approach to the wall that will carry it for years.
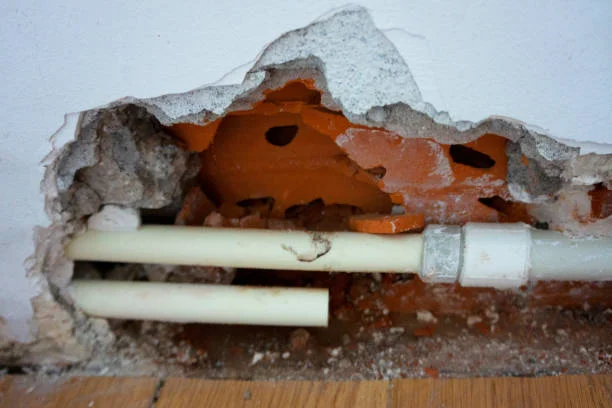
Cold water lines inside wall cavities can create moisture problems that stay out of sight long enough to become expensive. When humid indoor air comes into contact with a cold pipe surface, condensation can form and collect in places never meant to stay wet. Because this happens behind drywall, trim, and insulation or Cold water line condensation, the early warning signs are often subtle. A faint odor, minor paint changes, or a small stain may appear long after repeated moisture exposure has already affected surrounding materials. An isolated plumbing issue can become a broader wall assembly problem involving insulation, wood framing, and indoor air quality.
What Happens Behind The Wall
Surface Temperature Meets Indoor Humidity
Condensation on a cold water line begins with a simple temperature difference, but the wall cavity changes how serious that difference becomes. When a pipe carrying cold water drops below the surrounding air’s dew point, moisture in the air condenses on the pipe’s exterior. In an open room, that moisture may evaporate more easily or at least become visible. Inside a wall cavity, the situation is far less forgiving. Air movement is limited, drying is slower, and nearby materials can absorb moisture repeatedly over time. Pipe location matters as well. A line running through an exterior wall may stay colder longer because outdoor conditions already influence surrounding surfaces.
In contrast, a line inside a tightly sealed interior partition may face higher humidity from bathrooms, kitchens, or laundry areas. Contractors addressing comfort upgrades, such as Braintree air conditioning installations, sometimes encounter hidden wall moisture that is not caused by leaks at all but by condensation forming on chilled plumbing surfaces during humid weather. The problem often develops in cycles, with repeated wetting and partial drying that slowly weakens nearby materials without producing the dramatic signs people usually associate with plumbing failures.
Insulation Placement Can Help Or Worsen It
Insulation inside the wall cavity can reduce the risk of condensation, but only when it is positioned with an understanding of what needs to stay warm and what needs to stay separated from humid air. If insulation is installed carelessly around a cold water line, it may trap moisture against the pipe or nearby framing instead of helping keep the pipe isolated from exposure to humid air. In some walls, pipe insulation is missing entirely, allowing the pipe surface to interact directly with the cavity air whenever indoor humidity rises.
In other cases, batt insulation is compressed awkwardly around the plumbing, creating voids, air pockets, or localized cold spots that increase the likelihood of condensation. The problem becomes more complicated when the pipe sits near the warm side of the wall, and indoor humidity is high. Moisture does not need a large leak path to create trouble. It only needs repeated opportunities to condense faster than the assembly can dry.
Once insulation absorbs that moisture, its thermal performance can decline, which may make the surrounding cavity even more vulnerable. The wall then begins holding both colder surfaces and wetter materials, a combination that supports repeated condensation rather than interrupting it. That is why the insulation strategy matters just as much as pipe temperature when evaluating hidden moisture patterns.
Repeated Wetting Damages Materials Quietly
Cold-water line condensation within wall cavities is especially troublesome because it typically causes gradual deterioration rather than sudden failure. Drywall paper can begin to soften, wood framing can remain damp long enough to promote decay, and metal fasteners may corrode in conditions that never fully dry. Insulation can melt or lose effectiveness, and repeated exposure to moisture can create conditions that make mold growth more likely.
Since the source is condensation rather than a pressurized leak, homeowners may not see dripping water or obvious plumbing damage. Instead, they notice indirect signs such as peeling paint, a persistent musty smell, or a wall that feels cooler and slightly damp during humid months. Bathrooms are frequent trouble spots because cold-water lines often run near showers, sinks, or toilet supply branches in spaces that already produce heavy moisture loads. Kitchens, laundry rooms, and utility chases can behave the same way.
The damage pattern may also shift seasonally. During more humid months, the pipe can sweat repeatedly, while in drier conditions the problem seems to disappear, creating the false impression that it has resolved on its own. In reality, the wall may be cycling through wet and dry periods that slowly weaken materials over time without ever creating a dramatic event.
Dry Walls Depend On More Than Leak Prevention
Cold-water line condensation in wall cavities shows how moisture problems can begin without a single plumbing leak. The combination of low pipe temperature, humid air, limited drying, and poorly detailed insulation can create repeated wetting behind finished surfaces. Over time, that hidden moisture can affect insulation, framing, finishes, and indoor air quality even when the plumbing system itself remains intact.
Understanding the difference between a leak and condensation is important because the repair strategy changes completely once the real cause is identified. A drywall assembly depends not only on sound plumbing but also on controlling humidity, air movement, and pipe surface exposure, where the problem begins.
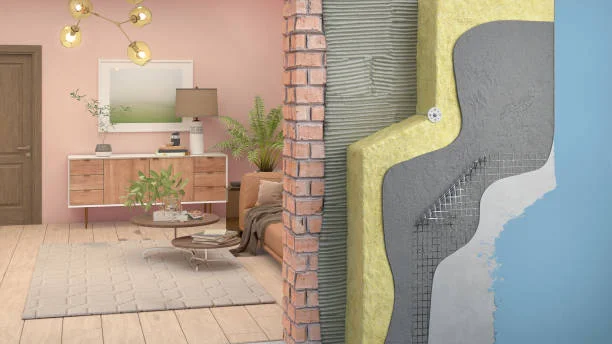
Indoor comfort is often blamed on the thermostat, the furnace, or the air conditioner, but exterior walls quietly shape how a home feels hour after hour. When wall insulation is weak or uneven, rooms can feel drafty in winter, overly warm in summer, and inconsistent from one side of the house to the other. Upgrading exterior wall insulation changes more than energy use. It affects surface temperatures, heat transfer, noise transmission, and how indoor air feels against the skin. That is why insulation improvements are often noticed not only on utility bills, but also in the daily experience of sitting, sleeping, and moving through the home.
Comfort Starts Outside
Surface Temperatures Shape Daily Comfort
One of the biggest reasons exterior wall insulation upgrades improve indoor comfort is that they change the temperature of interior wall surfaces. In a poorly insulated wall, outdoor conditions influence the inside-facing drywall much more directly. During cold weather, exterior walls can feel cool to the touch, and that cool surface can make a room feel uncomfortable even when the thermostat shows an acceptable temperature. The body reacts to surrounding surface temperatures, not just the number on the wall control.
When insulation levels improve, heat loss through the wall decreases, and interior surfaces remain closer to the room air temperature. That creates a more settled and even feeling indoors. The same effect matters during hot weather, when exterior heat is less able to radiate inward through the wall assembly. As a result, rooms along sun-exposed sides of the home often feel less harsh in the afternoon. Comfort becomes more stable because the walls no longer act as weak points in the building envelope. Instead of constantly pulling warmth away in winter or adding heat in summer, they begin supporting a calmer indoor environment that feels more consistent from morning to night.
Air Leakage And Draft Perception Change
Exterior wall insulation upgrades often improve comfort not only by resisting heat flow but also by reducing the small air movements people experience as drafts. Many wall upgrade projects include air sealing at penetrations, joints, and transitions, which means the home not only gains more insulation value but also has fewer hidden leakage points. That matters because a room can feel uncomfortable even when the actual air temperature seems reasonable if cool outside air is slipping through cracks around outlets, framing seams, or poorly sealed wall sections.
People often describe this as a room feeling chilly, uneven, or impossible to warm up fully. With better wall insulation and tighter air control, indoor air becomes steadier and less reactive to wind, outdoor temperature swings, and pressure changes. Homeowners considering broader envelope improvements, such as Wilsonville, OR Window Replacement, often notice that wall insulation upgrades help those improvements perform more effectively by reducing draft pathways around the structure. This creates a more uniform indoor feel, especially near perimeter seating areas, beds placed against outside walls, and rooms that previously felt less usable during colder or hotter months. Comfort improves because the home stops reacting so dramatically to what is happening outdoors.
Seasonal Stability Improves Room Use
Another major comfort benefit of exterior wall insulation upgrades is that rooms become easier to use consistently throughout the year. In many homes, certain areas develop a reputation: the back bedroom that feels cold in winter, the upstairs corner room that overheats in summer, or the living room wall that always feels drafty during storms. These patterns often trace back to heat moving too easily through exterior wall assemblies.
Once insulation is upgraded, those rooms usually respond more slowly to outdoor extremes and recover more easily when the HVAC system runs. This does not mean every comfort issue disappears, since windows, duct layout, shading, and air distribution still matter, but it often reduces the severity of room-to-room imbalance. It also affects how long comfort lasts between heating or cooling cycles.
A well-insulated wall helps the home retain its indoor temperature longer, rather than losing it quickly after the equipment shuts off. That steadier performance can make bedrooms more comfortable overnight, help living areas remain usable during weather swings, and reduce the urge to change thermostat settings constantly. The result is a house that feels less fragile and more predictable, which many people experience as a major quality-of-life improvement rather than simply a building upgrade.
A Better Envelope Feels Different
Exterior wall insulation upgrades influence indoor comfort in ways people notice every day, even when they do not immediately connect that change to the walls themselves. Warmer interior surfaces in winter, less heat gain in summer, fewer drafts, and more stable room temperatures all contribute to a home that feels calmer and easier to live in. The improvement is often subtle at first, then hard to ignore once the home no longer swings as sharply in response to outdoor conditions. Good wall insulation supports the entire building envelope, helping the HVAC system maintain comfort with less strain while making each room feel more consistent, settled, and usable across the seasons.
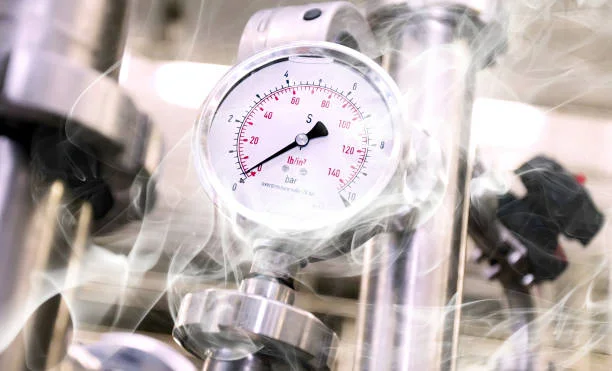
Airflow problems inside heating and cooling systems are often more serious than they first appear. A home may still receive conditioned air at the registers, yet the equipment can be operating under strain because the duct system is resisting movement far more than it should. Filters, coils, undersized returns, restrictive grilles, crushed flex duct, and closed dampers can all interfere with performance without creating an obvious symptom to the homeowner. Static pressure testing helps uncover those conditions by measuring the resistance the blower works against as air travels through the system. That makes it one of the clearest ways to locate hidden airflow restrictions before they lead to comfort complaints, rising utility costs, or equipment wear.
Measuring resistance properly
Why Airflow Restrictions Often Stay Hidden for Years
Many airflow restrictions remain unnoticed because forced-air systems can continue operating even when resistance inside the duct network is too high. The equipment may still turn on, cycle normally, and push air into the rooms, which can make the problem seem minor or unrelated to the system itself. In reality, the blower may be fighting a return path that is too small, a dirty evaporator coil, a restrictive filter cabinet, or supply ducts that create more resistance than the fan was designed to handle.
These conditions do not always announce themselves with a dramatic failure. Instead, they often show up as uneven temperatures, weak delivery in distant rooms, noisy returns, short equipment life, or comfort issues that change with weather and runtime. Static pressure testing matters because it gives technicians a way to measure what cannot be seen just by standing at a grille or checking thermostat operation.
The system may look intact from the outside while pressure readings reveal that air is being squeezed through a much more restrictive path than expected. This is especially important because many airflow problems are layered. A slightly restrictive filter, combined with a dirty coil and undersized return, may create a serious operating burden even though each issue appears manageable on its own.
Reading the System Instead of Guessing From Symptoms
Static pressure testing changes the diagnostic process from assumption to measurement. Rather than relying solely on room complaints or visible duct conditions, technicians use manometer readings to measure the resistance on the supply and return sides and across key system components. Those readings help show whether the blower is operating within an acceptable pressure range or whether the system is being forced to work against excessive restriction.
A technician can then compare pressure values against the equipment’s rated limits and begin narrowing down the source of the problem. For example, high return-side pressure may point toward a restrictive filter, undersized return ductwork, blocked return grilles, or a cabinet design that limits intake. High supply-side pressure may suggest a dirty indoor coil, closed dampers, undersized supply runs, or duct transitions that create excessive turbulence.
In many cases, companies like Essential Heating and Air use static pressure testing because it reveals more than a visual inspection alone ever could. A system may have clean-looking ductwork and still operate with poor airflow if hidden components add resistance. This testing gives structure to the diagnosis by showing where pressure builds, how severe it is, and which parts of the air path need closer attention before any repair decision is made.
Breaking Pressure Down Across Individual Components
One of the strongest advantages of static pressure testing is that it can be expanded beyond a single total reading. Once total external static pressure is known, technicians can take additional measurements across individual components to isolate where airflow is being lost. Pressure drop across the filter can show whether filtration is too restrictive for the blower and duct design. Pressure drop across the evaporator coil can indicate dirt loading, coil blockage, or airflow that is lower than it should be.
Measurements taken before and after zoning components, dampers, or sections of duct can help identify where the system becomes overly resistant. This step-by-step approach is useful because airflow restrictions are not always located where the homeowner expects them to be. A complaint about weak air in one room may actually trace back to a system-wide return restriction that is reducing delivery throughout the system.
Likewise, a technician may find that the duct layout is less of a problem than a coil that has accumulated enough buildup to choke the airflow path. Static pressure testing makes these distinctions measurable. Instead of replacing parts based on guesswork, technicians can identify which component is creating abnormal pressure and how that pressure affects the blower’s ability to move air through the system. That level of detail helps explain persistent comfort problems that have often been misdiagnosed for years.
Pressure testing makes hidden problems visible.
Static pressure testing gives technicians a practical way to uncover airflow restrictions that cannot be reliably diagnosed by appearance alone. Measuring resistance inside the system reveals whether the blower is operating against conditions caused by dirty coils, restrictive filters, undersized ducts, blocked returns, or other hidden limitations.
It also helps separate system-wide airflow problems from isolated comfort complaints, making repairs more precise and more meaningful over the long term. When pressure is measured carefully, the system’s behavior becomes easier to understand. That insight protects equipment, improves comfort, and helps ensure that airflow problems are identified at their source rather than quietly degrading performance over time.

How do Cold Water Line Condensation Issues Inside Wall Cavities?

How do Exterior Wall Insulation Upgrades Influence Indoor Comfort?

How do Tree Canopy Thinning Techniques Used to Improve Airflow and Light Penetration?

How does Static Pressure Testing reveal Hidden Airflow Restrictions?

How are Environmental Impact Considerations in Large-Scale Junk Removal Operations?
-

 General6 months ago
Felixing: A Philosophy of Turning Simple Ideas into Wonders
-

 Health6 months ago
Lufanest: Effective Local Anesthesia with Fewer Risks
-

 Entertainment5 months ago
هنتاوي.com: Your Gateway to Arabic Anime Content
-

 General7 months ago
bardoek: The Artistic Heritage Inspiring Modern Creative Trends
-

 General6 months ago
Discover Anonib AZN: An Anonymous Asian Forum
-

 Fashion7 months ago
fashionisk .com – Your Ultimate Guide to Trendy, Smart Fashion
-

 General6 months ago
Euroyungs com Explained: Multi-Niche Hub or Risky Site?
-

 Lifestyle7 months ago
Mariano Iduba: A Visionary Leader in Global Digital Growth